How to Brush a Curly Dog Coat: Step-by-Step Guide
Quick Answer
To brush a curly dog coat, work in small sections from the skin outward instead of brushing only the surface. Use a slicker brush to separate curls and remove loose hair, then check each section with a metal comb. Regular brushing helps prevent tangles from tightening into mats, which is especially important for curly-coated dogs. If you’re comparing grooming tools for different coat types, my guide to choosing brushes for dense dog coats explains why coat structure matters.
Quick brushing steps
- Check the coat: Feel for knots, mats, sore areas, burrs, and skin irritation before brushing.
- Divide into sections: Lift the curls so you can work close to the coat’s base instead of skimming the top.
- Brush gently: Use short slicker-brush strokes while supporting tangled hair with your free hand.
- Work systematically: Start low on the body and move upward one small section at a time.
- Comb-check sections: Run a metal comb through the finished area to find hidden tangles.
- Stop at tight mats: Don’t pull hard or cut close mats blindly with scissors.
The goal
- You should be able to pass a suitable comb through the coat comfortably without repeatedly snagging.
Curly coats can look perfectly tidy from across the room while hiding small tangles close to the skin. That’s what makes brushing them different from giving a short-haired dog a quick once-over.
I’ve found that technique matters more than speed. A careful section-by-section routine catches knots early and makes grooming much more comfortable for the dog.


What makes a curly dog coat different to brush?
A curly coat bends and twists back toward itself, so shed hair and loose strands can become trapped instead of simply falling away. That trapped hair can combine with friction and moisture to create tangles.
Curly-coat brushing is the process of separating that dense, curled hair from near the skin to the ends while removing loose hair and finding tangles before they tighten.
- Curled strands: Hair can wrap around neighboring strands more easily.
- Hidden knots: Surface curls may hide tangles closer to the skin.
- Friction areas: Armpits, collars, ears, legs, and harness areas often need extra attention.
- Coat density: A thick coat may require longer pins than a light, open curl pattern.
- Hair length: Longer curly coats generally need more sectioning than short clipped coats.
The American Kennel Club recommends slicker brushes for curly-coated dogs because their closely spaced wire pins can help remove loose hair and prevent mat formation. The key is using a light touch rather than pressing the pins into the skin.
What tools do you need to brush a curly dog?
For most curly pet coats, I prefer a simple two-tool setup: an appropriately sized slicker brush and a stainless-steel grooming comb. The brush does most of the separating, while the comb tells you whether the section is truly finished.
You may also need a detangling product for minor knots. Choose one formulated for dogs and follow its label directions.
| Tool | Best Job | When I Use It | Main Caution |
|---|---|---|---|
| Slicker brush | Separating curls and removing loose hair | Main brushing tool | Don’t press hard against skin |
| Metal comb | Finding remaining tangles | After each brushed section | Never yank through resistance |
| Dog detangling spray | Adding slip to minor tangles | When dry strands catch easily | Follow product directions |
| Pin brush | Light finishing and maintenance | On loose, well-maintained curls | May miss tight undercoat tangles |
A brush that works beautifully on one dog may be too short for another. Pin length should match the coat depth rather than simply the dog’s body size.
How do you brush a curly dog coat step by step?
 Save
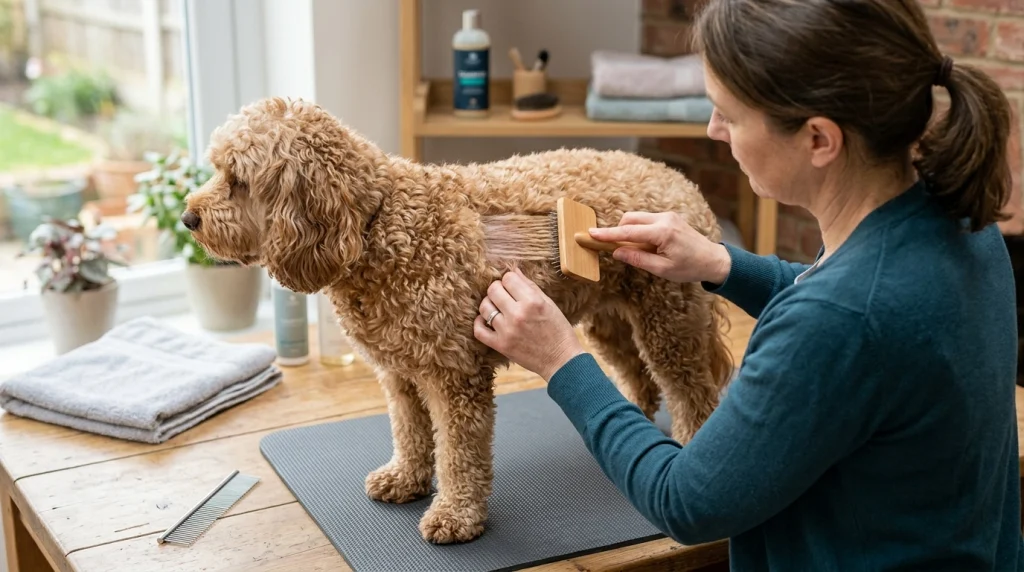
SaveThe safest approach is to work slowly from one small section to the next. I want to reach the base of the coat without repeatedly scraping the dog’s skin.
- Let your dog settle. Start in a comfortable, non-slip area where your dog can stand or lie securely.
- Inspect the coat with your hands. Feel for mats, lumps, sensitive areas, debris, and damp patches before using a brush.
- Choose a small starting section. The lower leg or lower side of the body often gives you an easy place to begin.
- Lift the hair above that section. Use your free hand to expose a narrow layer of coat closer to the skin.
- Brush the exposed hair. Make several short, controlled strokes instead of one forceful pull.
- Move the part slightly upward. Release another narrow layer and repeat the same process.
- Support tangled hair. Hold the hair between the tangle and the skin when practical so pulling doesn’t transfer directly to the skin.
- Check with your comb. Pass it gently through the completed section from near the base toward the tips.
- Move to the next section. Continue until you’ve covered the body, legs, tail, ears, and other coated areas appropriate for your dog.
- Finish before patience disappears. It’s better to complete two calm sessions than force one long, stressful grooming session.
This section-by-section method is commonly called line brushing. The name refers to lifting the coat in lines so you brush underneath rather than only polishing the visible surface.
How do I know when a section is brushed properly?
A finished section should separate easily and allow an appropriate metal comb to move through without a hard stop. Don’t judge only by appearance.
I use the comb as my quality check. It’s surprisingly common for a slicker brush to move smoothly over the top while the comb finds a tiny knot underneath.
- Good sign: The comb passes through with little resistance.
- Needs more work: The comb repeatedly catches in one specific spot.
- Stop and investigate: The dog flinches, the skin pulls, or the knot feels tightly attached.
Should you brush a curly dog wet or dry?
Don’t assume that soaking a tangled curly coat will make brushing easier. Water can make some existing tangles harder to manage once the coat is washed and dried.
The ASPCA recommends giving dogs a good brushing before bathing to remove loose hair and mats. I follow the same principle before putting a curly-coated dog into the bath.
- Before bathing: Find and address manageable tangles first.
- During bathing: Avoid aggressively rubbing the coat back and forth.
- After bathing: Dry according to your dog’s coat needs before completing the grooming routine.
- With grooming sprays: Follow the manufacturer’s directions rather than saturating the coat unnecessarily.
Dog shampoos should also be selected for canine skin rather than substituted with everyday human shampoo. The American Kennel Club’s dog shampoo guidance explains why coat and skin type matter when choosing products.
How often should you brush a curly-coated dog?
There isn’t one schedule for every curly dog. Coat length, density, activity, clipping style, clothing, harness use, and the individual dog’s tendency to tangle all change the answer.
A longer, dense curly coat may need attention very frequently. A dog kept in a short practical clip may be easier to maintain.
| Coat Situation | What to Do | Areas to Check Closely |
|---|---|---|
| Long, dense curls | Check and brush frequently | Ears, legs, armpits, collar area |
| Short clipped curls | Brush based on tangling and regrowth | Longer ears, tail, head, legs |
| After harness or clothing use | Check friction areas | Chest, shoulders, armpits |
| After outdoor activity | Inspect promptly | Feet, legs, belly, ears |
The ASPCA notes that brushing frequency depends heavily on coat type. Regular grooming also gives you a chance to spot skin problems, parasites, wounds, or unusual hair loss while they’re easier to see.
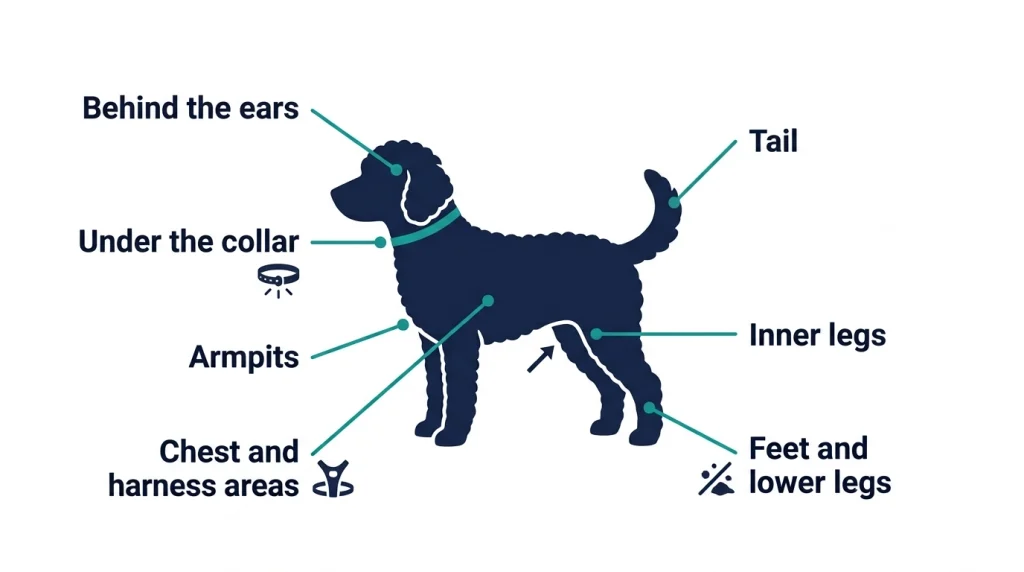
Where do curly dogs mat most easily?
 Save
SaveMats often develop where hair experiences repeated movement, pressure, or rubbing. That means the places you can’t see easily deserve as much attention as the dog’s back.
- Behind the ears: Soft hair and constant ear movement can encourage tangling.
- Under the collar: Friction can twist neighboring curls together.
- Armpits: Leg movement creates continuous rubbing.
- Chest and harness areas: Straps can compress the coat.
- Inner legs: These areas are easy to skip during quick brushing.
- Feet and lower legs: Moisture, dirt, and outdoor debris can contribute to knots.
- Tail: Longer tail hair may tangle even when the body coat looks fine.
I check these areas first with my fingers. Finding a small tangle early is far easier than discovering a broad, tight mat later.
How do you remove tangles without hurting your dog?
For a small, loose tangle, reduce tension before you start brushing. Hold the hair near its base when possible and work gradually from the outside of the knot instead of pulling straight through it.
Stop when the tangle is too tight to separate comfortably. Persistent pulling can turn a routine grooming session into something your dog learns to avoid.
- Use your fingers to separate loose strands where possible.
- Support the hair so less pulling reaches the skin.
- Work on the ends of the tangle before moving closer to its base.
- Use short brush strokes rather than dragging through the entire knot.
- Take breaks if your dog becomes uncomfortable or restless.
Don’t blindly cut a tight mat with household scissors. Skin can be drawn into or hidden beneath matted hair, making accidental cuts possible.
The ASPCA advises seeking professional help when you’re unsure how to deal safely with severe matting. Painful mats, open sores, redness, or other skin problems also deserve professional attention.
What mistakes should you avoid when brushing curly hair?
The biggest mistake is brushing only the visible surface. A fluffy finish doesn’t prove that the coat underneath is free of knots.
As of 2026, my approach is still intentionally simple: light pressure, small sections, and a comb check. Fancy tools don’t compensate for rushed technique.
- Surface brushing: The top looks smooth while knots remain close to the skin.
- Pressing too hard: Slicker pins can become uncomfortable when forced into the skin.
- Yanking knots: Hard pulling causes discomfort and can make the dog resist grooming.
- Skipping friction zones: Collars, harnesses, ears, and armpits need deliberate checks.
- Waiting for visible mats: Small tangles are much easier to manage early.
- Using one tool blindly: A slicker may brush well while a comb still finds hidden tangles.
- Making sessions too long: A tired dog is less likely to cooperate calmly.
Owners of heavy-shedding breeds face a different grooming challenge. My guide on managing loose undercoat and shedding shows how the routine changes when trapped curls aren’t the main problem.
How can you make brushing easier for your dog?
Start with short sessions and reward calm behavior. Grooming gets easier when the brush predicts something safe and ordinary instead of a long wrestling match.
The American Kennel Club also encourages getting puppies accustomed to brushing and handling early. That foundation can make coat maintenance far easier later.
- Pick a quiet spot: Reduce unnecessary distractions.
- Use secure footing: Slipping can make an already uncertain dog more nervous.
- Start with easy areas: Don’t make the first stroke land on a painful knot.
- Reward cooperation: Use praise, treats, or another reward your dog values.
- Keep sessions manageable: Work a few sections and continue later if needed.
- Watch body language: Turning away, flinching, sitting repeatedly, or trying to leave can signal discomfort.
One lesson I keep coming back to is that completing the entire dog isn’t always the most important goal. A calm ten-minute session can be more useful than forty minutes of struggling.
When should you stop brushing and call a groomer or veterinarian?
 Save
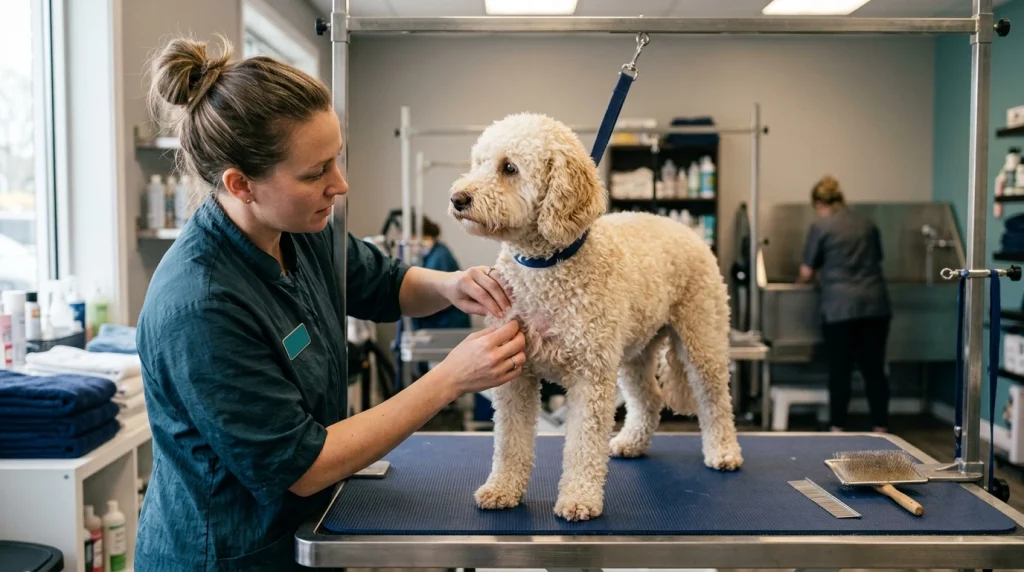
SaveRoutine brushing shouldn’t require you to fight through painful, skin-tight mats. A professional groomer has the equipment and experience to decide how those areas can be handled safely.
Skin changes also deserve attention. The ASPCA’s dog grooming guidance advises seeking veterinary help when hair loss appears with problems such as irritation, sores, persistent scratching, or bald areas.
- Tight matting that pulls on the skin
- Open sores or bleeding
- Persistent redness or inflammation
- Strong signs of pain during gentle handling
- Unexplained bald patches
- Heavy scratching or repeated chewing
- Unusual bumps or skin changes hidden beneath the coat
Brushing is also a useful hands-on health check. When something feels different from your dog’s normal coat or skin, don’t assume that more brushing will solve it.
Curly Dog Brushes I Would Consider
If you’re ready to build a simple grooming kit, I’d choose tools that complement each other instead of buying three brushes that perform the same job.
🏆 Best Premium Slicker
Chris Christensen Big G Slicker Brush
★★★★½
The Big G is a long-pin slicker designed for dense and demanding coats. I like this style when a shallow slicker keeps passing over the surface instead of reaching through longer curls.
🐾 Best Everyday Option
Hertzko Self-Cleaning Slicker Brush
★★★★☆
This popular slicker uses fine bent wires and a push-button mechanism for clearing collected hair. I’d consider it for routine coat maintenance when convenient cleanup matters.
🔎 Best Finishing Check
Andis Steel Pet Comb
★★★★½
A steel comb gives you a simple way to check whether your slicker reached through the whole section. I consider this the finishing tool rather than an optional extra for longer curly coats.
Frequently Asked Questions
What type of brush is best for a curly-haired dog?
A slicker brush is often the most useful primary tool for a curly coat because its fine pins can separate hair and remove loose strands. Match the pin length to the coat depth, use light pressure, and follow with a metal comb to find tangles the brush missed.
Can I brush my curly dog every day?
Frequent gentle brushing can suit many longer curly coats, especially dogs that tangle easily. The correct schedule depends on coat length, density, activity, and clipping style. Daily brushing shouldn’t mean repeatedly scraping the same skin with excessive pressure.
Why does my dog’s coat still have knots after brushing?
You may be brushing the surface without reaching the coat near the skin. Work in small lines, lift the upper hair, brush each exposed section, and then use a metal comb to check your work. A smooth-looking surface doesn’t guarantee the underneath is tangle-free.
Should I brush my curly dog before a bath?
Yes, it’s sensible to inspect and brush the coat before bathing so you can find loose hair and existing mats first. The ASPCA also recommends brushing before bathing. Tight or painful matting should be handled carefully rather than aggressively brushed during bath preparation.
Can I cut a mat out of my dog’s coat with scissors?
Don’t blindly cut a tight mat close to the skin with household scissors. Dog skin can be pulled into or hidden beneath matted hair, increasing the risk of injury. For severe, skin-tight, or painful matting, a professional groomer is the safer choice.
Final Takeaway: Brush the Coat From the Inside Out
If you remember one thing, don’t judge a curly coat only by how smooth the top looks. Separate it into small sections, brush close enough to reach the base comfortably, and use a metal comb as your final check.
Keep your pressure light and make grooming routine rather than reactive. Catching a five-minute tangle today is much easier than dealing with a tight mat next week.
Start with one calm section, reward your dog, and build from there. Consistency is what makes a curly coat manageable.
Thomas Cutter is a lifelong dog owner and the founder of FindOutAboutDogs.com. With over 10 years of hands-on experience owning multiple breeds, Thomas created this site to provide honest, research-based dog advice that real owners can actually trust.
